Tuesday, 11 January 2022

Maple Tree


Hi guys, we recently completed a botany unit study and learned about maple trees as part of our Canadian geography studies. Here are some of the activities we did. 


life of a maple leaf using this beautiful puzzle from Alison's Montessori. 


We also learned how to make maple syrup


Layers of a tree trunk


This book was really good for explaining the process. It's really detailed.


At the end of our study we made pancakes and enjoyed them with maple syrup

Tuesday, 4 January 2022

Ontario Province Study


Hi guys, today I wanted to share with you our Ontario province study. Here are some of the activities we did. 


We learned all about the CN Tower and build a model from Lego.  You can read all about it by clicking on the image above. 


We also learned all about The Great Lakes


We did a mini unit about water. Click on the image above to read all about it. 


Niagara Falls 


We reviewed the cardinal directions and made a compass rose out of salt dough. Click on the image above to read all about it. 


We put together a terrarium during our water unit. 

I hope you enjoyed reading all about our Ontario study. We are off to Quebec next!

Tuesday, 21 December 2021

Compass Rose


To help my boys learn about the compass rose we did some fun hands on activities. Here are some of the things we did. 


We started by reviewing the cardinal directions using 3 part cards from The Modern Montessori Guide.


Next we made a compass rose out of salt dough. We used a template from Kids Activities Blog.


We glued all the pieces together with hot glue.


Thursday, 16 December 2021

Rock Candy


Hi guys, today I wanted to share with you how we made rock candy during our cave unit study. 

Ingredients

3 cups of sugar
1 cup of water
A pot
Jar or a cup with small opening
Clothes pins
Stick or skewer
Sugar


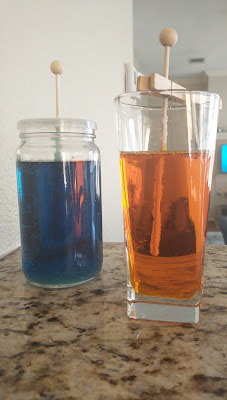
Adult supervision is required. Mix together sugar and water stir well and set it on the stove top. Keep mixing until the sugar has completely dissolved and the solution starts to bubble. You can add food coloring and flavor to your liquid at this point. Set aside for 10 minutes to cool. While your solution is cooling take your skewer and dip it in water. Roll it in some sugar and leave it to dry. This will be your seed crystals. Once the solution has cooled pour it into the jar. Suspend your stick in the solution using the clothes pin. It takes about 7 days to grow your rock candy.  


You can read all about the other activities we did during our cave unit here. 
After seven days you can remove your rock candy. Slowly chip away the sugar crystals around the sides. Remove the stick and suspend it over another empty glass cup or jar. Allow the excess sugar to drip away. Enjoy your candy.


Click on the image above to read all about it. 

Cave in a Cup Demonstration


Hi guys, today I wanted to share with you a fun simple demonstration about how caves are formed. 

Caves are typically formed by water. When it rains, the water oozes into cracks found in softer types of rock (limestone). As time goes by, the liquid slowly dissolves the nearby rock and wears it away. This causes the cracks to gradually widen in caverns. As the water level drops, caves and passages that we can explore are left.  

Material

1. Clear container or cup
2. Sugar cubes
3. playdough
4. dropper
5. toothpick

Instructions
Form a wall of sugar cubes on the side of your container. Roll out the playdough and cover the sugar cubes. Seal the sides by squishing the playdough on the edges. Make holes on the top of the playdough using your toothpick. Drop some water on the playdough and observe what happens. If the water is not getting in make your holes bigger. The holes represent the cracks in the rocks. 


This demonstration will show your child how a cave is formed. As the water seeps into the holes and reaches the sugar cubes, the sugar cubes start to dissolve. This is similar to what happens in a cave. As water gets into the cracks it slowly erodes the soft limestone rock. In a cave this takes a long time to happen. Once the water drains away you have an empty space and a cave has been formed. You can make a hole at the bottom of your cup and do it over a sink or bowl. Once the water drains away you will be left with your cave in a cup. 

Cave Unit Study


Hi guys, today I wanted to share with you all the activities we've been doing for our cave unit. This was a short mini unit about a week long. Here are some of the activities we did. 


We learned about different types of caves using three part cards. 
You can grab these cards from my TPT store


We also learned about how limestone reacts to acid using vinegar. 


We also made a cave in a cup after learning how caves are formed. You can read all about this science demonstration here. 


One of my sons favorite experiments was making rock candy. You can read all about how we made it here. 


Cave anatomy using this felt cave from Montessori By Mommy Cave Unit. 


Stalactite and Stalagmite. 

Sunday, 12 December 2021

South America Study


Hi guys, today I wanted to share with you our mini South America study. Here are some of the things we did during this study. 


We started with a sewing project. Continent mini pillow. 


Learned about the different biomes of South America. We used dry beans to represent each biome. 


Next we learned all about Llamas when we studied about the country of Peru. 


We made Llamas using pipe cleaners and wool felt. You can get details for this project from Little World Wanderers free Peru study.


We also baked sweet bread when we studied about the country of Argentina


We also made a diy pin it map to practice the country names, capitals, and flags using a cork board. 


This was a good opportunity for us to learn some Spanish and review old vocabulary words. In this activity we were learning opposites. 


We learned all about Peruvian weaving. 

We also learned about the rainforest, toucans, read lots of books, watched videos, and did map activities. 

Related Posts Plugin for WordPress, Blogger...
01